Wednesday 28 May 2014

Windows 7 Installing Steps

Load in your Windows 7 DVD and boot it. It will now load the setup files.

language, time & currency format, keyboard or input method and click Next.

Click Install now.
Check I accept the license terms and click Next.

Click Upgrade if you already have a previous Windows version or Custom (advanced) if you don’t have a previous Windows version or want to install a fresh copy of Windows 7.


(Skip this step if you chose Upgrade and have only one partition) Select the drive where you want to install Windows 7 and click Next. If you want to make any partitions, click Drive options (advanced), make the partitions and then click Next.


It will now start installing Windows 7. The first step, (i.e. Copying Windows files) was already done when you booted the Windows 7 DVD so it will complete instantly.

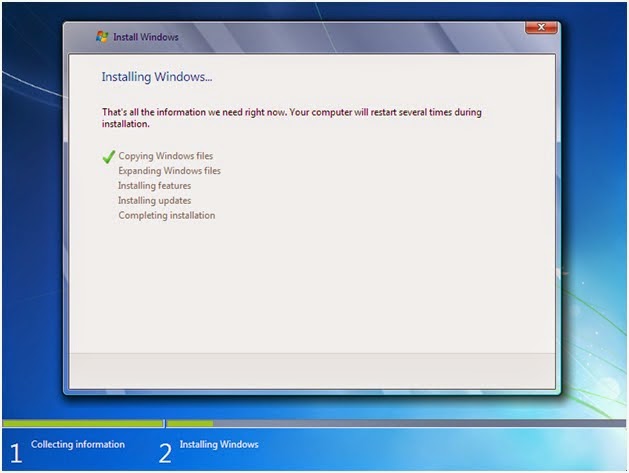
After completing the first step, it will expand (decompress) the files that it had copied.


The third and fourth step will also complete instantly like the first step


After that it will automatically restart after 15 seconds and continue the setup. You can also click Restart now to restart without any delays.


After restarting for the first time, it will continue the setup. This is the last step so it will take the most time than the previous steps.

It will now automatically restart again and continue the setup. You can click Restart now to restart without any delays.


Type your desired user name in the text-box and click Next. It will automatically fill up the computer name


If you want to set a password, type it in the text-boxes and click Next


Select your time and click Next
If you are connected to any network, it will ask you to set the network’s location.


Tuesday 27 May 2014

Installing Windows XP - Step By Step
Windows XP, possibly Microsoft's best OS so far is aimed both at the corporate and home market, with subtle differences between the two flavours "XP Pro" & "XP Home".
Designed to have a more intuitive interface than previous releases of Windows,  XP is targeted more at the casual than power user IMO.  While the functionality of previous versions is retained, and in many ways, improved, the front end is designed more for ease of use than "tweakability".
This simplicity extends as far as the installer, with a lot of the system configuration either fully automated, or wizard driven.
In this tutorial, we will take a freshly built system and install XP Professional from scratch on a single blank 10 GB hard disk.
1. Getting your hardware 'up to date'.
Like Windows 2000, XP makes extensive use of the Microsoft ACPI (Advanced Configuration & Power Interface), which relies heavily on your system BIOS (Basic Input / Output System).  Many slightly older systems may not be set up to take advantage of ACPI functionality, so it's worth checking with your motherboard and/or peripheral vendor to see if an ACPI compliant BIOS upgrade exists for your hardware.

Additionally, XP has a fairly comprehensive hardware database, so there's a fairly good chance that a majority of your hardware will be directly supported.  To this end, Microsoft has provided a hardware compatibility search tool, which can be accessed here.


As with the installation of any new OS, it's always a good idea to know what hardware you have inside your box, and to acquire the appropriate drivers for anything non-standard, such as video cards, sound cards, internal modems & network cards.  Hardware wise, XP is designed to prevent you from installing unsuitable drivers, so it's important to make sure that anything you are going to download is XP compatible.

2. Starting the install in text mode.
Starting an XP install is relatively simple.  The CD-Rom containing the installation files is self booting, and provided you have set your boot priority in the BIOS to attempt boot from CD-Rom first, you should be up and running within a few seconds!  If your hard disk contains a previous OS, such as Windows 98, you will be given the opportunity to either boot from the CD, or from your hard disk. If not, the XP installer goes directly to this screen first :


*Important Note For RAID Users!!
For those of you wishing to install XP on a RAID based system, you should have a finger hovering over the F6 key, so that you may install the relevant drivers from floppy disk prior to install.  XP natively supports, for example, the Highpoint HPT370 Raid Controller, yet it does not support the Promise FastTrak Lite controller used in many systems such as the MSI K7T266Pro2-RU.  If you do not install drivers at this stage for an unsupported RAID controller, you will get a third of the way through the install before XP crashes with an "Inaccessible Boot Device" error.


Hit F6 when you see this screen :

Next, the XP installer will load a series of generic drivers for such devices as SCSI & IDE controllers.  At this point, XP is simply trying out drivers to see what it can find and work with :

This part of the process can take several minutes, during which time, your CD-Rom drive will be exceptionally busy, as the XP installer tries out several hundred different driver files.  Once this hardware discovery process has finished, you will be given several options :


Provided you are happy to continue, simply hitting your <enter> or <return> key will take you on to the next screen, which contains the Microsoft licence agreement.  If you are willing to accept it, press the F8 key to continue.

The next screen we encounter, allows us to add or remove partitions, and decide where XP is going to 'live' :


As you can see from the above screenshot, the hard disk which we are going to install XP on is presently blank, with no existing partitions. If you are happy to use the entire disk space as a single partition (namely C:), you can just hit <enter> at this point, and XP will automatically partition the hard disk, and designate it as the drive that will be used.  If on the other hand, you would like to split the disk space into two or more parts (partitions), then you should press <C> to manually designate partition sizes.
3. Creating custom partitions using the XP installer.
In the following example, we are going to split the new 10gb hard disk into 2 separate but equal sized partitions, which will ultimately become our C: & D: drives.


Having pressed <C> to specify custom partitions, we are presented with the following screen :


Here, we are going to create a 5gb partition to be used for our startup or boot drive, and another 5gb partition which we can store personal files on.
A calculator can come in handy at this point, as you will have to tell the XP installer what size the partition will be in megabytes.  If you simply wish to use 50% of the disk capacity for the boot drive then take the overall disk size, which in this case is10229 megabytes, and divide by two.  If you intend to specify, for instance a 4gb partition for XP to live on, then you must multiply the number of gigabytes required by 1024.  This may seem strange, but 1 gigabyte is actually 1024 megabytes.
At this point, you may be wondering why the disk size at the top of the screen says one thing, and the value just above the grey box has a smaller figure.  The installer can see the entire size of the hard disk, but such factors as cluster size, and file system overhead can marginally change that value.  Before you go stomping back to the poor guy who sold you the hard disk, complaining bitterly, be aware, all file systems will do this.
Another point to note is that the figure you enter into the grey box in megabytes may be changed to a small degree by the installer.  Again, this is down to cluster size, so don't panic if your figures don't exactly tally up.
As you can see below, the 5120 megabyte partition that we specified has been changed slightly :


At this point, we can either create the second partition, or leave it until after XP is installed.  As a matter of good practice, it's probably best to get all your partitioning finished at this point.  In order to create the second partition, just use your cursor keys to move to the unpartitioned space and press <C> again.


As you can see, we now have a C: & E: partition.  This may seem a little weird, but in effect the reason that our second partition has not taken the D: drive letter is because during the initial hardware detection, our cd-rom drive has claimed D: . When XP is installed, you should find that the drive letter have juggled themselves into a more orderly fashion.

4. Formatting your drives.
After you have made your partitions, whether it be a single one using the entire disk capacity, or multiple ones, you will need to decide which drive to install XP to.  It is common practice to use the C: drive, as most software will want to install there, and it saves an awful lot of confusion later on.  In addition to this, you may find that if you install XP onto a different drive, some software may not work properly!


Once you have selected the drive which you are going to install XP to, you are presented with several formatting options.
Unless you have a real need to format the drive so that other operating systems such as Windows 98 can use it, I would recommend formatting with NTFS.  The NTFS file system is a more secure, stable & optimised file system than FAT or FAT32, and despite XP's ability to use FAT/32 I do not believe that either are as well suited in terms of reliability or performance.
Once you have decided which file system you are going to use, you can format the disk either conventionally, or using the quick option.  If you are sure that the disk is reliable and does not contain any bad sectors, using the quick format can save you quite a bit of time.  If on the other hand, you are unsure of the drive's integrity, or the disk is new, I recommend using the conventional (but slow) format.  It may take some time to conventionally format a drive, but it may save you a lot of heartache later on.


5. Copying Files.
Once the installer has formatted the C: partition or drive, it will begin to copy all the files which XP needs onto the hard disk :


This part of the install process can take quite some time, even on the fastest of machines.  The longest part of the file copy is the transfer of the driver.cab file onto the hard disk.  If your machine looks like it's stalled, or hung at this point, don't panic.... this file is huge, and can take a long time to copy.

Once the file copy has completed, your machine will reboot.  It is not necessary to remove the installation CD at this point. 

Upon restart, your machine will give you the option to boot from CD.  This is unnecessary, as enough of the XP installation set exists on the hard disk to continue without booting from the CD.  Basically, when your computer prompts you to "press any key to boot from CD" dont!

At this point, the graphical part of installation will start.  The machine will continue to copy files from the CD, and generally configure XP.  Expect to wait some time while this part of the process occurs :


After this, XP will do an in-depth detection of your hardware.  You may find that your screen goes blank or flickers several times.  This is nothing to worry about, as the installer is trying to figure out exactly what hardware is inside your computer :


6. Getting Interactive
Once hardware detection is complete, it's time for you to set up your personal preferences.  First on the list is establishing your location and input language


The default settings for location and keyboard layout are US, so you might want to change these depending on your country.  Firstly, alter your location and format settings by clicking the 'Customise' button.

As you can see from the above screenshot, I have changed my 'Standards & formats' to English (United Kingdom).  This allows me to use the correct currency symbol for my country, as well as the correct notation for both numeric and time / date displays.  Additionally, I have also set my location to 'United Kingdom'.

Once you are happy with your selection, click 'Apply' to save the changes, and then 'OK' to return to the previous screen.
Next up, we need to change our keyboard layout to suit our location.  This aspect of the install is a little annoying as common sense dictates that if i live in the UK, it's more than likely I will be typing with a UK keyboard!
Click the 'Details' button to be presented with this screen :


Now here's the tricky part.  By default, the installer will only have provided you with an English (United States) keyboard layout.  To install a different keyboard layout, you will need to click the 'Add...' button, and select your chosen layout from the list that appears.  Once you have clicked OK to return to the above screen, you need to click on the drop down box located at the top of the window, and select your preferred layout.  If you don't do this, XP will start up with a US keyboard by default.  It isn't a big problem to change this later, but you might as well set it right to begin with!
You may be tempted to delete the un-necessary US keyboard layout, but unfortunately the installer wont let you, since it is presently using it.
Again, once you have set your preferences, click 'Apply' to save the changes, and 'OK' to return to the previous screen.
At this point, it's safe to click 'Next>'
The next question the installer will ask is your Name and Organisation Details :


Simply type your name, and if applicable, the name of your organisation or company.

Next, you will need to enter your product licence key, which should be located either on the Windows XP manual, the back of the CD case, or on a sticker which you should attach to your PC.


Be careful when you enter this code.  If you get even one digit wrong, XP will refuse to continue installation until you correct the error. 
Once you have entered the product key details correctly, you will be asked for a name for your computer and  an administrator password :


Be especially careful when entering an administrator password.  Ensure the password is something that you will not easily forget, and if possible substitute certain letters for numbers eg. I's become 1's, E's become 3's and so on.
The reasoning behind substituting letters for numbers is so that unauthorised persons wishing to gain access to the admin functions of your machine will have a substantially harder time getting in if they cant spell the password the way you have.  The administrator account on your machine is very powerful, and any unauthorised person gaining access to your machine (either in your absence or via the internet) using that account can do a great deal of harm.
Once you are satisfied with the machine name, and your password, you will be asked to set your date, time & time zone, relative to GMT :


As you can see below, I have set my time zone to GMT :

Once you have completed this task, the installer will configure your networking.  If your machine is connected to a LAN (local area network), XP will give you the option of selecting either typical settings or custom.  If your machine is part of an office, or small home network, it is usually perfectly acceptable to select typical settings, as XP can normally work out your settings for you.  If in doubt, ask your system administrator for applicable settings.


Next, the installer will ask you for the name of your workgroup.  A workgroup is a name used to identify a collection of computers within a local area network, most commonly found within an office environment.
If your computer is used at home, or is stand alone, it is not necessary to set a workgroup name.  As an example here, we have made this machine a member of the 'Bitbendertech' workgroup.


7. Finishing Off
Once you have completed the interactive steps, the installer will copy the files necessary for configuring your networking:


After that, the XP installer will spend a considerable amount of time finalizing settings, and configuring your computer.  During this part of the process, your computer is doing a remarkable amount of work, so don't get concerned if it seems to be taking a long time :


Once this final step is complete, your machine may reboot, and you should see 


8. Final Steps
Once XP has booted for the first time, you will be presented with an incredibly easy to understand wizard, which will guide you through adding users, configuring internet access, and setting screen resolution.  I have chosen not to cover this aspect of the installation, because  the wizard is remarkably self explanatory, and any discussion here would be un-necessary.
Provided the installation has gone smoothly, you finally will be presented with your XP desktop :

                            The End